A stainless steel muscle scraper is a hands-on tool used in soft-tissue work to glide along muscles and fascia, helping target tight, sore, or overworked areas. When used with good technique and reasonable pressure, it can be a helpful add-on to mobility work, strength training, and therapist-guided physical therapy plans.
Below is a practical, safety-first guide to what a stainless steel scraper does, who it’s suited for, how to use it without overdoing it, and what to look for when choosing one for a recovery routine.
What a stainless steel muscle scraper is (and how it works)
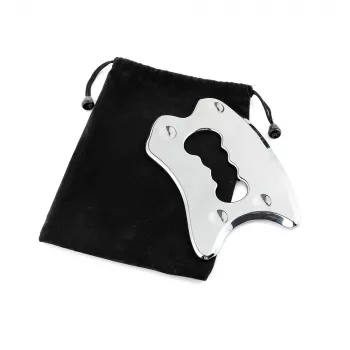
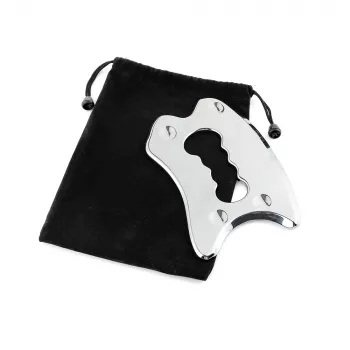
A stainless steel muscle scraper is a contoured metal tool designed to apply controlled pressure while gliding over skin and soft tissue. It’s commonly associated with instrument-assisted soft tissue mobilization (IASTM)-style techniques used in sports recovery and clinical settings.
Because the tool has defined curves and edges, it can “scan” along an area and make it easier to notice spots that feel ropey, tender, or restricted. The goal isn’t to force tissue into submission—it’s to deliver consistent, repeatable contact that can support comfort, movement confidence, and follow-up mobility work.
Stainless steel is popular because it offers a smooth glide, is easy to clean, and holds up well over time. A well-finished tool also tends to move more predictably over lotion or balm, reducing the chance of skin irritation from drag.
Potential benefits for recovery and physical therapy routines
Used appropriately, a muscle scraper may help reduce perceived tightness and post-exercise soreness, especially when paired with mobility drills and sensible training loads. Many people also find it improves body awareness—when a specific line of tissue feels notably tender, it can help guide where to stretch, strengthen, or adjust workload.
Scraping can fit into warm-ups, cooldowns, or short “maintenance” sessions on common problem areas like calves, quads, hamstrings, forearms, and upper traps. The key is gentle, controlled technique rather than long, aggressive sessions.
Common use cases and where a scraper can fit
| Goal |
Where it fits best |
Typical session length |
| Warm-up tissue prep |
Light glides before training on the main working muscle groups |
2–5 minutes per area |
| Post-workout recovery |
Gentle, broad strokes after training plus stretching |
5–10 minutes total |
| Targeted tight spots |
Short bouts on a specific tender line of tissue, then mobility/strength work |
30–90 seconds per spot |
| Desk-related stiffness |
Low pressure on neck/upper back and forearms, paired with posture breaks |
3–8 minutes |
For background on manual approaches often paired with mobility and rehab, see Cleveland Clinic’s overview of myofascial release therapy and how clinicians typically apply it: https://my.clevelandclinic.org/health/treatments/24011-myofascial-release-therapy. For a patient-facing view of physical therapy goals and safe progression, APTA’s ChoosePT is also a helpful reference: https://www.choosept.com/.
Who it’s for (and when to avoid it)
A stainless steel scraper can be a good fit for active individuals managing routine muscle tightness, athletes following structured recovery habits, and people using it as part of a therapist-guided physical therapy plan.
It’s also important to know when not to use it. Avoid scraping over open wounds, rashes, sunburn, or irritated skin. Stop immediately if pain is sharp, burning, electrical, or worsening—those are not “good signs.”
Use extra caution (or skip it unless cleared by a clinician) if any of the following apply: bleeding disorders, anticoagulant use, a strong tendency to bruise, acute inflammation, or recent surgery. Also avoid direct pressure over varicose veins, bony prominences, the front of the neck/throat, and sensitive nerve pathways. Numbness or tingling is a clear stop sign.
How to use a muscle scraper safely: step-by-step technique
1) Prep the skin for glide
Apply a small amount of lotion, oil, or massage balm to reduce friction. Dry scraping increases drag and can irritate skin quickly.
2) Set the angle and start lighter than you think
Hold the edge at roughly a 30–60° angle to the skin. Begin with light pressure and gradually increase only if the area tolerates it. More pressure isn’t automatically better; often it just increases soreness and bruising without improving results.
3) Use simple strokes first, then get specific
Start with long glides along the length of the muscle (for example, along the calf or quad). If a small zone feels especially tight, switch to short “buffing” strokes over that spot for a brief window—then return to broader strokes.
4) Keep sessions short and reassess often
5) Lock in the change with movement
6) Watch the skin response
Choosing a stainless steel scraper: shape, edge, and finish
Cleaning, storage, and durability
Product options to get started
FAQ
Does a muscle scraper hurt, and is bruising expected?
Mild discomfort and temporary redness can happen, but sharp pain or significant bruising usually means too much pressure or too much time on one spot. Reduce intensity, use more glide, and keep sessions short.
How often can a stainless steel scraper be used?
Start with 2–3 times per week per area, or short daily light sessions if your skin tolerates it well. If soreness or bruising shows up, take extra recovery time and prioritize mobility and strength work afterward.
Can it be used for plantar fascia or around joints?
Use caution around sensitive structures and avoid aggressive scraping near joints. Keep pressure light, consider working indirectly around the area, and consult a clinician for persistent pain or known conditions.
Recommended for you










Leave a comment