Dust, crumbs, and lint collect in the narrow gaps around keys and device seams, where wipes and cloths struggle to reach. A small brush with gentle bristles and a comfortable handle makes routine cleanups faster, safer for finishes, and easier to do consistently—especially for keyboards, laptops, and other everyday electronics.
Why a small soft-bristle brush belongs in a desk-cleaning kit
- Reaches tight spaces between keycaps, along switch plates, and around laptop hinge lines where microfiber cloths can’t fit.
- Lifts dry debris instead of smearing it, which helps reduce grime buildup along the edges of keys.
- Provides gentler contact than many stiff utility brushes, helping avoid scuffs on keycap legends and nearby surfaces.
- Works as a quick “between deep cleans” maintenance tool that pairs well with compressed air or a low-suction vacuum.
- Stays useful beyond keyboards: vents, controller seams, camera bags, car dashboard crevices, and desk accessories.
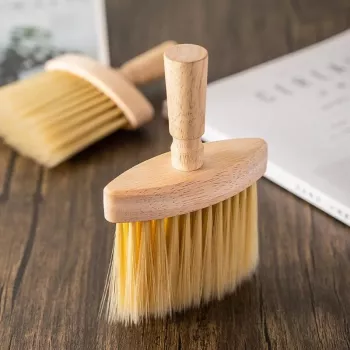
What this wooden-handled brush is designed to do
When cleaning electronics, the goal is controlled removal—nudging dust and crumbs out of places that trap them—without grinding grit into surfaces. A compact brush with soft bristles is built for exactly that kind of low-risk, high-control maintenance.
- Soft bristles help loosen and sweep dust from crevices around keys, ports, and seams without harsh scraping.
- A compact head makes it easier to angle into corners (like between arrow keys, function rows, and tight laptop gaps).
- A wooden handle offers a stable grip for controlled strokes, useful for delicate areas such as around switches and stabilizers.
- Works best for dry debris removal; follow with a wipe on surrounding surfaces to collect what’s been lifted.
Common cleaning tasks and the best approach
| Task |
Best tool combo |
Quick tip |
| Dust between keycaps |
Soft brush + compressed air (optional) |
Brush first to loosen; blow air second so debris exits instead of packing deeper. |
| Crumbs in corners of a keyboard frame |
Soft brush + low-suction vacuum |
Vacuum nearby while brushing to capture debris as it lifts. |
| Laptop keyboard and hinge line dust |
Soft brush + microfiber cloth |
Short strokes away from the screen; wipe the palm rest afterward. |
| Device vents and speaker grilles |
Soft brush (gentle) + air (light bursts) |
Avoid forcing debris inward; use light outward sweeps. |
| Desk mat seams and accessory grooves |
Soft brush + cloth |
Brush toward the cloth to trap fine dust. |
A simple keyboard-cleaning routine (2–5 minutes)
This quick routine is designed for frequent upkeep. It’s short enough to do weekly, but thorough enough to prevent dust from turning into stuck-on grime.
- Power down and unplug the device; for wireless keyboards, remove batteries if practical.
- Turn the keyboard upside down and gently tap to dislodge loose crumbs (over a trash bin).
- Use the soft bristles to sweep between rows and around edges; keep strokes light and controlled.
- If using compressed air, apply short bursts at an angle so debris exits the keyboard rather than driving deeper inside.
- Finish by wiping the keyboard frame and surrounding desk area with a microfiber cloth; let everything dry before powering back on.
- For mechanical keyboards: occasional keycap removal can help, but brushing between keys is often enough for weekly maintenance.
For device-specific safety guidance—especially around screens, ports, and finishes—reference manufacturer recommendations such as Apple Support’s cleaning guidance and Microsoft’s Surface cleaning tips.
Where soft bristles matter most (and where to be cautious)
- Keycap legends and matte coatings: Softer bristles reduce the chance of visible scuffing compared to stiffer brushes, especially with repeated weekly use.
- Tight crevices around trackpads, laptop hinges, and bezels: Gentle brushing helps avoid lifting edges or pushing grit into seams.
- Vents and grilles: Use light pressure and avoid aggressive back-and-forth scrubbing that can wedge debris deeper.
- Avoid brushing wet spills: For liquid, prioritize power-off, drying, and appropriate steps recommended by the device maker.
- Test first on delicate finishes: If a surface is highly glossy or easily scratched, test a small area and keep pressure minimal.
Care and storage so the brush stays effective
A brush performs best when the bristles keep their shape and don’t hold onto the same dust you’re trying to remove.
A practical, low-cost upgrade for cleaner devices
Recommended picks (in stock)
FAQ
Can a soft-bristle brush damage keycaps or a laptop keyboard?
With light pressure and soft bristles, routine dusting is generally safe for most keyboards and keycaps. Avoid aggressive scrubbing, work gently around delicate seams, and test a small spot first if the finish is easily scratched or specialty-coated.
Should compressed air be used before or after brushing?
Brush first to loosen debris, then use short, angled bursts of air to push the loosened dust out and away. Blasting air first can sometimes drive particles deeper into gaps before they’re freed.
How often should a keyboard be brushed out?
A quick weekly brush-out is a good baseline for most desks. If you eat at your workstation, have pets, or notice visible buildup, brushing a few times per week helps prevent debris from becoming stuck-on grime.
Recommended for you













Leave a comment