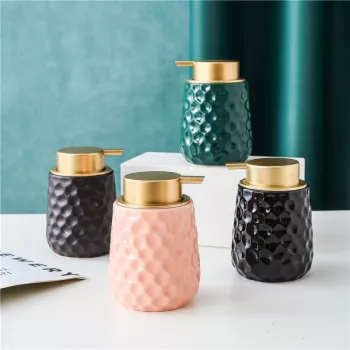
A ceramic dispenser keeps soap or lotion close at hand while helping countertops look more intentional. With a sturdy body and refillable pump design, it can reduce clutter from mismatched plastic bottles and make daily handwashing feel a little more put-together—whether it’s for the bathroom vanity or the kitchen sink. It’s a small change that quietly improves the way the whole sink zone looks and functions, especially in spaces where water splashes and traffic are constant.
What Makes a Ceramic Dispenser Different
Not all dispensers behave the same once they’re actually living next to a faucet. Ceramic has a few practical advantages that show up in everyday use.
- Heavier, more stable base than many lightweight plastic bottles, helping reduce tipping near wet sink edges.
- Smooth, non-porous glazed surfaces are typically easier to wipe clean than textured containers that grab residue.
- Works as a permanent countertop piece: refill rather than replace, which helps keep the area consistent.
- Pairs well with common finishes (chrome, matte black, brass) when matched with a compatible pump tone.
For households that prioritize frequent handwashing, a dispenser that stays put and wipes clean quickly can make the routine feel less fussy. For best practices on handwashing, see the guidance from CDC and Mayo Clinic.
Where It Works Best: Bathroom, Kitchen, and Beyond
A ceramic dispenser is designed to look like it belongs on a counter—so it’s useful anywhere you want a cleaner setup and fewer loose bottles.
- Bathroom vanity: hand soap, lotion, face wash, or gentle body wash for guests.
- Kitchen sink: dish soap or hand soap to reduce visual clutter and keep a consistent look.
- Laundry room: detergent, stain remover, or hand soap near a utility sink.
- Entryway console: hand sanitizer or lotion for high-traffic homes (place on a small tray to catch drips).
If you like the “set” look, keeping the same dispenser style in multiple rooms can make the home feel more cohesive—without needing a full renovation.
Material and Build Details That Matter
Two ceramic dispensers can look similar in a photo and feel very different in real life. A few build details tend to separate the frustrating from the dependable.
- Glaze quality: a smooth, even finish tends to resist staining and makes quick wipe-downs easier.
- Pump performance: look for consistent output and a snug fit to reduce leaks around the collar.
- Base stability: wider bases feel steadier, especially on narrow sink ledges.
- Refill opening: a wider mouth can make refilling less messy and easier to rinse out between product changes.
Common Dispenser Materials at a Glance
| Material |
Strengths |
Things to Watch |
| Ceramic |
Stable feel, polished look, easy wipe-down with mild cleaner |
Can chip if dropped; avoid abrasive scrubbers on glaze |
| Glass |
Clean, minimal look; doesn’t absorb odors |
More breakable; can be slippery when wet |
| Plastic |
Lightweight and budget-friendly |
Can look worn faster; may warp or discolor over time |
| Stainless steel |
Durable, modern appearance |
Shows fingerprints/water spots; pump quality varies widely |
Keeping the Pump Smooth and the Surface Clean
Ceramic is fairly low maintenance, but the pump and collar area deserve a little attention—especially if you use thicker soaps or lotions.
- Wipe exterior regularly with a soft cloth and mild soap; dry to prevent water spotting.
- If the pump clogs, rinse the pump tube in warm water and prime it with a few presses.
- Switching products: rinse the interior with warm water, let it fully dry, then refill to avoid diluted soap.
- Use a tray or coaster if your sink area is prone to drips, especially on porous stone counters.
A quick rinse cycle for the pump every so often can also help keep the output consistent, so you don’t end up pressing twice for a single wash.
Styling Ideas for a More Coordinated Countertop
Once the dispenser looks intentional, the rest of the sink area often benefits from a simple “edit.” A few styling moves can make the space easier to clean and nicer to use.
- Create a simple sink set: dispenser + matching tumbler + small dish for rings or sponges.
- Use a narrow tray to group items and make cleaning around them faster.
- Match the pump finish to nearby hardware (faucet, cabinet pulls) for a cohesive look.
- Keep labels minimal: a small waterproof label can help guests distinguish hand soap vs. lotion.
In a bathroom, a vertical organizer can also keep heat tools off the counter, so the sink area stays focused and uncluttered. If you’re building a tidier vanity zone, the Hair Dryer Stand with Vertical Storage Rack pairs naturally with a cleaner sink setup.
For a straightforward option, the Ceramic Soap & Lotion Dispenser offers that stable ceramic weight and a clean, polished look that works in both bathrooms and kitchens.
If you’re refreshing the overall feel of a bathroom or powder room, lighting can amplify the “pulled together” effect—especially warm, textured fixtures that soften hard surfaces like tile and stone. The Handmade Wabi Sabi Rattan Pendant Light is one way to add a calm, elevated accent that complements simple ceramic countertop pieces.
FAQ
Can a ceramic dispenser be used for both hand soap and lotion?
Yes. It can handle either product, though thicker lotions may pump more slowly; rinsing and priming the pump can help if the flow becomes inconsistent.
How should a ceramic soap dispenser be cleaned without damaging the finish?
Use mild dish soap and a soft cloth. Avoid abrasive pads or harsh cleaners that can dull the glaze, and dry after wiping to reduce water spotting.
Why does a soap dispenser pump get clogged, and how can it be fixed?
Clogs often come from dried soap residue or very thick products. Rinse or soak the pump components in warm water, flush the tube, then prime with repeated presses until the output returns to normal.
Recommended for you












Leave a comment