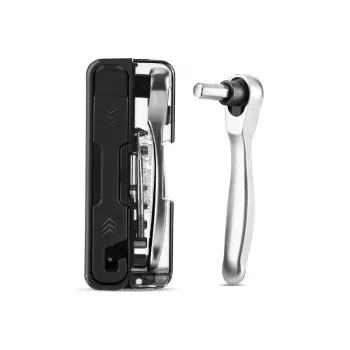
A compact ratchet kit can turn a frustrating trailside or roadside repair into a quick adjustment—without stripping bolt heads or fumbling with loose bits. A 15-in-1 multi-function ratchet wrench kit is built around one idea: cover the fasteners you’re most likely to touch on modern MTB and road bikes, while staying small enough for a saddle bag or pocket.
Below is what a 15-in-1 ratchet kit typically does best, what to check before buying or packing it, and how to use it safely on today’s components (especially carbon). For torque basics and why “just a little tighter” can be too much, Park Tool’s overview is a solid reference: Park Tool — Torque Specifications and Concepts. For component-specific guidance, manufacturer manuals matter, such as: Shimano — Dealer Manuals.
What a 15-in-1 Ratchet Wrench Kit Is Designed to Do
A mini ratchet wrench kit combines a small ratcheting handle with multiple bits so common bike fasteners are covered in one tool. Compared with a straight folding multi-tool, a ratchet can feel more controlled in tight spaces—around bottle cages, cockpit parts, and brake calipers—because you can keep the bit seated while your hand moves through short strokes.
The ratchet mechanism also speeds up repeated loosening/tightening, which helps when you’re making small adjustments and re-checking alignment several times. The best kits strike a balance between packability and leverage: enough handle to work confidently, but compact enough for travel, glovebox kits, or day rides.
What’s Typically Included (and Why It Matters on Bikes)
Most 15-in-1 ratchet kits revolve around four elements:
- Ratcheting wrench body: lets you turn consistently without constantly repositioning the tool.
- Bit set for bike hardware: commonly focuses on hex sizes used on stems, handlebars, seatposts, derailleurs, and rotors.
- Extensions/adapters (when included): improves reach for recessed bolts, such as certain seat clamps or linkage hardware.
- Storage case or organized holder: keeps bits from disappearing in a frame bag and makes the most-used sizes quick to grab.
Common Bike Tasks Covered by a Ratchet Bit Kit
| Bike task |
Typical fastener type |
Why a ratchet helps |
| Adjust stem/handlebar position |
Hex bolts |
Fast back-and-forth tightening with better access near cables |
| Tighten seatpost clamp |
Hex bolt |
Controlled tightening to reduce risk of over-torque on carbon frames/posts |
| Align brake caliper |
Hex bolts |
Small movements and quick rechecks without removing the tool each turn |
| Install bottle cage / accessories |
Hex bolts |
Works well in tight frame triangles |
| Derailleur adjustments (mount/bolts) |
Hex bolts |
Smoother handling in cramped drivetrain area |
Fit and Compatibility Checks Before Buying or Packing It
Before you rely on a mini ratchet for real rides, confirm it actually matches your bike’s hardware and access constraints:
- Bit sizes: verify the kit includes the hex sizes your stem, seatpost clamp, rotor bolts, and accessories use. MTB and road standards can vary by brand and model.
- Bit length: longer bits help with recessed bolts; shorter bits can be the difference between fitting near a crowded cockpit or not.
- Ratchet head clearance: make sure the ratchet thickness can reach bolts near brake hoses, shift housing, and frame junctions without rubbing or forcing an angled approach.
- Carbon components: for critical fasteners (stem, handlebar clamp, seatpost, some suspension hardware), plan to finish tightening with a torque key or torque wrench set to the component’s specified Nm.
How to Use a Mini Ratchet on a Bike Without Damaging Bolts
Mini ratchets are capable tools, but the small format can tempt overconfidence. A few habits go a long way toward protecting bolt heads and threads:
- Seat the bit fully: push the bit straight into the bolt head before turning. Partial engagement is the quickest route to rounding a hex.
- Start by hand: thread bolts in with fingers (or the gentlest tool pressure) to avoid cross-threading, then use the ratchet to snug.
- Use short, controlled strokes: in tight areas, keep pressure in line with the bolt. Avoid levering sideways on the bit.
- Stop at “snug” for critical bolts: if you don’t have a torque tool mid-ride, aim for secure-but-not-maxed. When possible, re-check at home with a torque wrench.
- Don’t force gritty bolts: if a fastener binds, back it out, clean the threads, and re-lube rather than muscling through.
Roadside vs. Home Workshop: Where This Kit Shines
Care, Storage, and Longevity Tips
15-in-1 Multi-Function Ratchet Wrench Kit for MTB & Road Bikes is currently in stock and positioned as an easy add-on for riders building a compact repair loadout.
Other In-Stock Picks
FAQ
Is a mini ratchet safe to use on carbon handlebars and stems?
Yes for loosening and light adjustments, but final tightening should be done with a torque wrench to the component’s specified Nm. Tighten stem faceplate bolts evenly in a cross pattern so the clamp load stays balanced.
Which bike repairs can’t a ratchet wrench kit replace?
It won’t replace specialty tools for chain repairs, tire/tubeless repairs, spoke truing, or drivetrain service like cassette and bottom bracket tools. Think of it as a fastener-focused tool, not a complete workshop.
How do you avoid stripping hex bolts when using a ratchet?
Use the exact bit size, seat it fully, and apply steady straight-line force instead of twisting at an angle. Clean debris from the bolt head, avoid over-torque, and swap out worn bits before they start slipping.
Recommended for you












Leave a comment